While working on my impending comics-inspired site design, I’ve been rediscovering my old enthusiasm for drawing comics, and incidentally rediscovering some tips and techniques I haven’t put into practice in years. Most of my creative juices flow directly onto a computer screen, but there’s great satisfaction in the organic act of making marks on dead trees.
For those not in the know, drawing comics involves a few self-explanatory stages: penciling, inking, lettering, and coloring. Perhaps the least understood stage of the process is inking — embellishing pencil-drawn art with solid black lines for better reproduction. But it aint just tracing, y’know. Ink also adds definition, contrast, depth and detail to the artwork. It’s an integral part of the visual language of comics. There aren’t many resources to turn to if you want to learn specific methods of inkcraft, but luckily there isn’t really much to know. The techniques of inking are simple, it’s the art of it that takes skill and practice. So in the interest of adding to the global inking knowledgebase, here are a few tips for drawing a straight line.
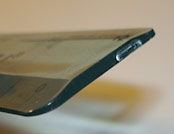
 While it’s possible to ink lines with a brush, straight lines are almost always inked with a pen (either a technical pen or an old fashioned metal-nibbed dip pen). It probably goes without saying that a ruler is vital equipment for the task. Ruling a line seems like a no-brainer, but as you drag the nib along the straightedge you’ll find that the ink strongly desires to flow under the ruler thanks to surface tension and capillary action. The solution is to prevent the wet ink from coming into contact with the ruler’s edge. Many rulers are already designed for this with a backing that raises the edge off the surface (you can also tape a few coins to one side). But personally I like clear plastic rulers that allow me to see the art, so I use a beveled ruler and simply flip it over. This creates a nice gap between the straightedge and the paper surface.

Ruling lines with a brush is tricky and requires some practice, but it can produce a nice effect. Even the steadiest hand will tend to vary the pressure on the bristles a bit throughout the movement, which will cause irregularities in the line weight and give a line some character. This could almost be considered the height of inkcraft, and the zenlike ability to produce a perfect straight line with a brush is the mark of a master inker. Of course, even master inkers usually rule their lines with a pen so that’s that. Even so, it’s a good exercise and a good skill to have in the arsenal.
 Put one edge of your ruler on the surface and lift the other edge, holding the ruler at an angle to the paper (I find it helpful to plant my thumb on the paper, right against the back edge to keep the ruler from sliding towards me). Then you can run the ferrule of the brush (the metal bit that holds the bristles) along the raised edge. It’s the same trick as the inverted bevel, just with a much bigger gap to accomodate the bristles. One difficulty with this technique is holding the ruler completely straight and steady as you draw the line, especially when you get to the end farthest from the hand supporting the ruler. Your fingers will interrupt the straight edge, shortening the maximum line you can draw in a single pass. Long, even lines are really hard to do this way, and frankly it’s just easier to use a pen unless you’re aiming for a distinctive brushed effect.
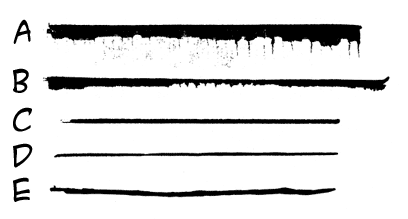
So let’s see some lines. In the example below, line A was inked with the ruler flat against the paper, letting the ink bleed under the edge. When the line is done and the ruler is then moved, it drags the ink with it making a big ugly smear. Line B attempts to minimize the smearing by lifting the ruler straight up from the paper, but the bleeding still fattens and slops the line. Line C was inked with a Speedball C-6 nib and the beveled ruler flipped over, giving a sharp clean line ideal for panel borders. Line D was inked with a brush, attempting to keep it as even as possible. Even then, you can see subtle variations in line weight, which gives the entire line some humanity. Line E was inked with a brush and I wiggled my hand quite a bit for a worn ragged effect.

Cool tips…did you draw the hands in the illustrations? Nice job!
I drew them, but not by hand. The illustrations were done in, well, Illustrator, with an angled brushstroke to kind of simulate the look of a flat-nib pen. But it does raise the issue of digital inking, which is commonplace for web comics but hasn’t quite made it into mainstream print comics. Obviously none of my advice applies to inking on a computer.
The lines were inked traditional old-school style then scanned and appear here slightly larger than actual size. The photo of my ruler is… a photo of my ruler.
oh and don’t forget to pronounce caPILLary correctly ;)